#Introduction
As part of my devops-focused independent study at RIT, I explored creating basic CI/CD pipelines using GitHub Actions. This process involved adding workflow configuration files to a repository, using public actions available on the GitHub Marketplace to easily add functionality or integrations, and authenticating with external services using secrets. Once I had a grasp on the fundamentals I looked into best practices for making modular reusable pieces of configuration, and finally expanding the scope to include deploying the output of the build phases on Google Cloud. This page is a slightly adapted version of the lab report that I submitted for that assignment, which is effectively a tutorial for how to get started with GitHub Actions based on the steps I took.
The complete code is archived on GitHub↗.
Throughout this process I found the Actions Documentation↗ to be very thorough, and more than adequate for resolving most of my points of confusion once I understood where to find what I needed. I’ve also linked to some of the most helpful and/or relevant pages throughout.
It is assumed that you have a GitHub account, a local git install that you are able to push/pull to GitHub from, and basic familiarity with git commands and the GitHub web interface. The actions you’ll write integrate with Docker Hub and eventually Google Cloud Platform (GCP) in Part 3, each of which require an account if you don’t already have one.
Obligatory pun: This page is action-packed!
#Creating a Basic Action to Build a Docker Image
To get started we’ll setup a GitHub repository and write a basic Actions to build a containerized web service and publish it to Docker hub.
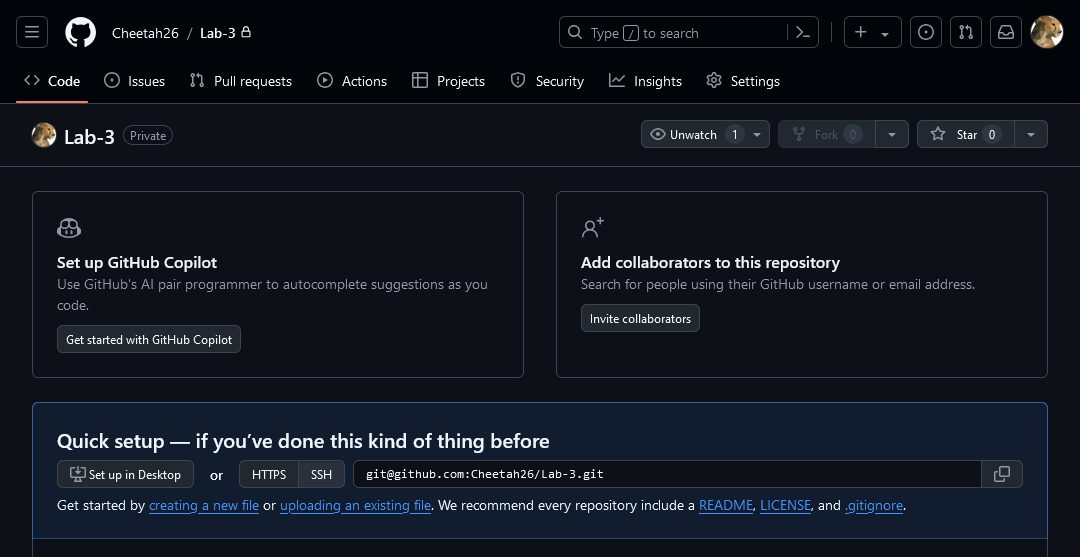
Create a new empty Git repository on GitHub.
Clone the repo to your local machine, and then add the application that you’d like to automate building into the repo. For the lab, I wrote a very simple HTTP server written in Go. It responded to any GET request with a plaintext message, which could be overridden through an environment variable. The important part is that you have a Dockerfile for building the application into an image.
Create a new top-level directory in the repo called
.github. GitHub looks at the folder for a number of configuration files related to various GitHub features. For our purposes, we need to create another subdirectory inside of it calledworkflows, which is where Actions definitions are expected to be.Now to create our first workflow! First create a YAML file in the
.github/workflowsfolder. Since this action will build a Docker image, it makes sense to call itbuild-image.yml, but the filename doesn’t actually matter Before jumping straight to goal, let’s start simple and explore the runner environment some. Here’s the starting file’s contents:name: Build Image on: push jobs: build-image: runs-on: ubuntu-latest steps: - uses: actions/checkout@v4 - run: treeThis shows the basic format that most workflows follow. The
namefield is a display name for the GitHub UI.onshould be one or more event triggers↗ that dictate when workflow should be run. This could be used, for example, to create one workflow that runs a testing suite on every push, and another which automatically builds the production binary when a commit is tagged as a release.The
jobssection is a list of tasks that the workflow runs. These are executed in parallel by default to speed up the run time. Each job specifies the machine type that it will use withruns-on, and a list ofsteps. Each step is either a lowercase-a action or a command to run. This example features both:The
usesfield indicates that the step is an action, in this caseactions/checkoutfrom the GitHub Marketplace↗. The additional@v4locks this action to a particular major version and is required to prevent changes from breaking the workflow. According to the documentation↗, “This action checks-out your repository under $GITHUB_WORKSPACE, so your workflow can access it.” $GITHUB_WORKSPACE is the default working directory, which we never change, so it will be our current directory when we run the next step.runliterally runs the specified command on the workflow host. In this case, we’re simply callingtreeto see the contents of the checked-out directory.
Save the workflow file, then we stage, commit, and push the changes to GitHub to see what happens. Here’s what my
git statusshowed before the commit, so that you can see where the workflow file is and the contents of the example web-server directory, since we’ll see that reflected in the Actions output.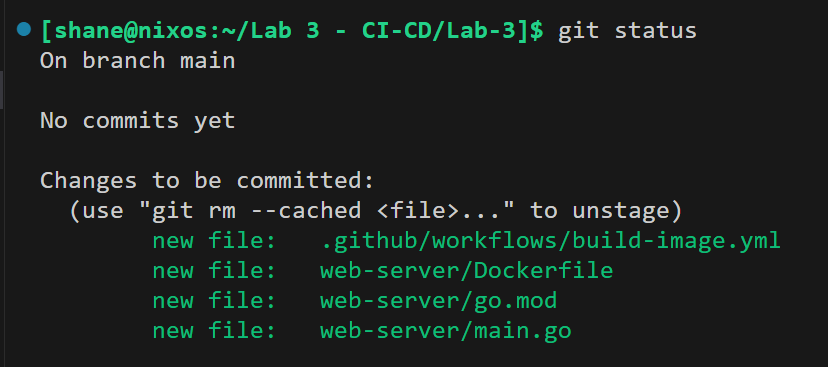
Open the repo on GitHub and click “Actions” in the top navigation bar. You’ll see the run from this commit, which by default uses the commit message as a display name. Click into it and then the build-image job to see the job output.
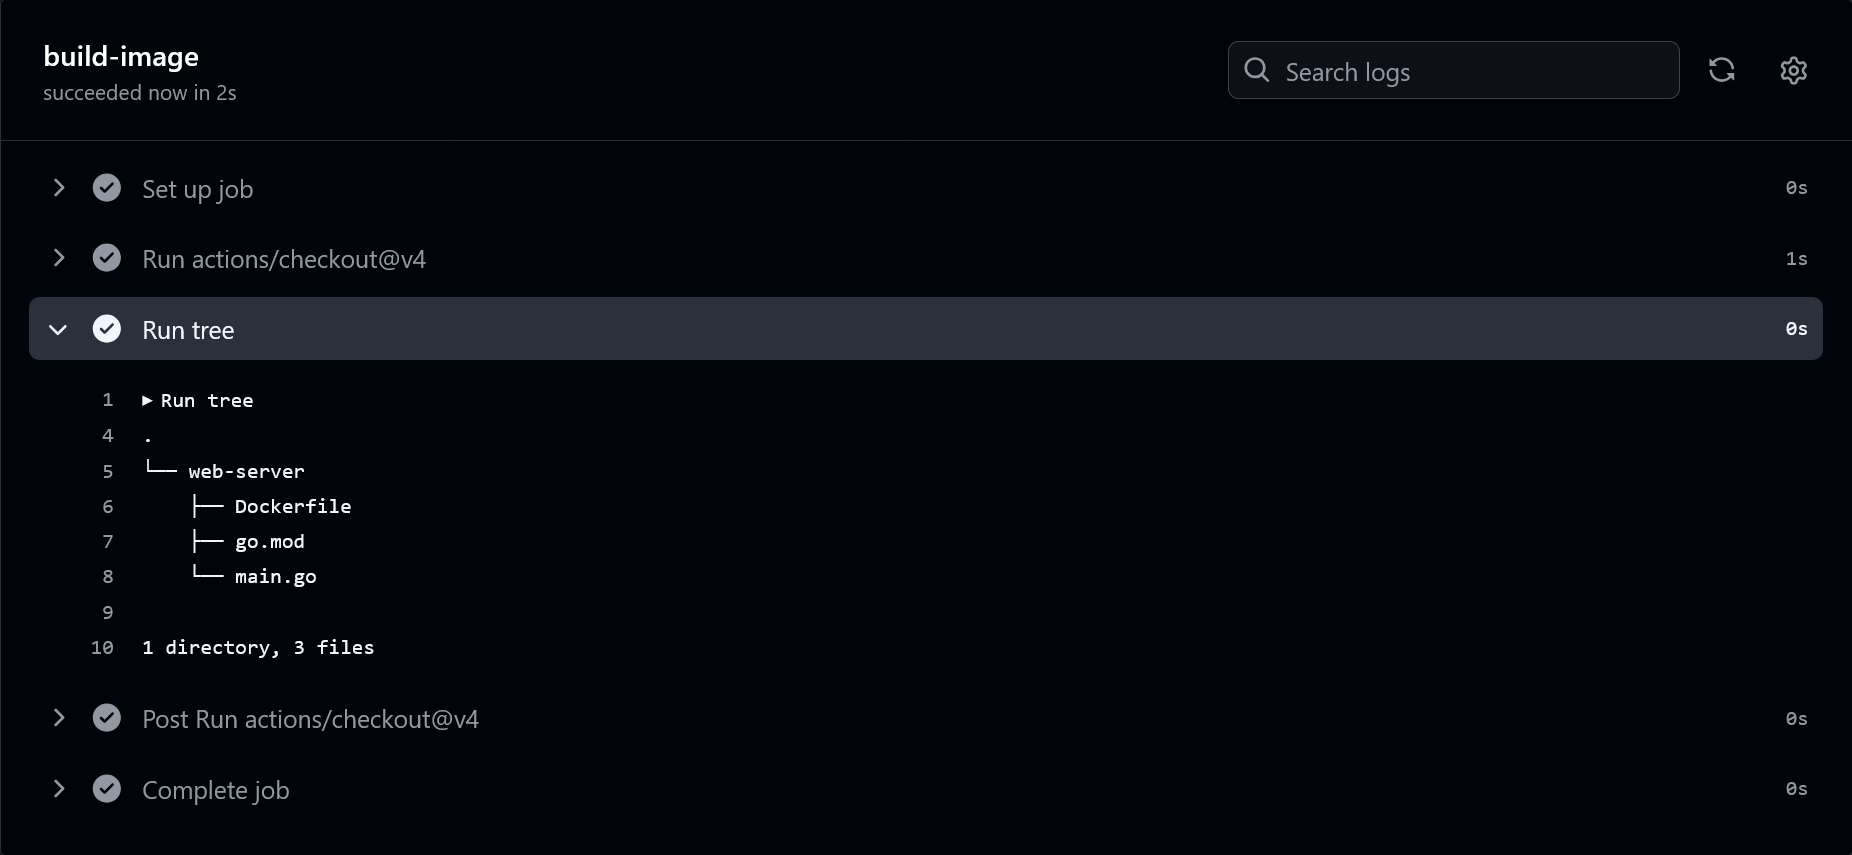
Great, looks like the repo!
This brings up a question: how did I know that
treewould be installed? Furthermore, when we want to rundocker build, how do we know whether Docker will be installed on Action runner’s system? To find out, look at your job output, expand the “Set up job” step, and expand “Runner Image”. The output includes a link labelled “Included Software”, which is exactly what we want: a list of everything that’s pre-installed on the system! (If you aren’t following along, here’s the link for Ubuntu 22.04↗ as an example.)Now that we’re familiar with the basic syntax and have a feel for how the runners work, it’s time to get building the container image. You could just replace the
run: treestep with arun: docker buildcommand, followed byrun: docker push, etc. But, a major aspect of GitHub Actions is the reusable actions (makes sense, doesn’t it?). It so happens that there already exists adocker/build-push-action↗ action, so let’s use that! To do this, remove the tree step and add it in with ausesstep:#... steps: - uses: actions/checkout@v4 - uses: docker/build-push-action@v6 with: context: ./web-server tags: Cheetah26/web-server:latestRundown on the new syntax: actions can define inputs and outputs, so the
withsection is how we pass values to an action’s inputs when we call it. We are supplying two values, thecontextfor the build (usually optional, but my Dockerfile resides under./web-server/rather that the repo root), andtagto define the resulting image’s tag. These inputs, and many of the other available ones, are essentially the same as when manually callingdocker build.Note that under the hood this is actually using
docker buildx, which is more advanced than the standard builder, including options such as those for reducing build times via caching. In our simple use case this doesn’t change anything, though the logging outputs may appear slightly different than what you’re used to.If you were to push this now, there’s one major problem. The runner would build successfully, but then it gets cleaned up and our resulting image disappears. We need to tell the
build-push-actionto actually push the image somewhere so that we can access it after the fact. Docker Hub is an obvious choice, but of course we can’t push without first authenticating. Here’s how that’s done:# ... checkout - uses: docker/login-action@v3 with: username: cheetah26 password: ${{ secrets.DOCKER_HUB_PAT }} - uses: docker/build-push-action@v6 with: context: ./web-server tags: cheetah26/web-server:latestUsing another action, of course! Docker provides the
login-actionto authenticate with any of the major container registries. It defaults to Docker Hub, so we don’t need to specify that anywhere, but if we wanted to use a different one we would include theregistryinput with the domain name, such asgcr.iofor Google’s. If you choose do that, don’t forget to update the image’s tag in the build action to include the registry name as well.So what’s going on with that weird dollar-sign and brackets for the password? Since this file is getting pushed to a repo where it can be seen by many eyes, it would be very unwise to include a password in plaintext. The
${{ ... }}is a templating syntax that gets replaced with the value of whatever variable we name inside the brackets. There are a number of contexts available↗ (the part before the.), with potentially useful default information, or access to additional values that we provide. Here we’re referencing thesecretscontext which contains any secrets we’ve added to our repo through the GitHub interface.To add this secret to your repo, first open Docker Hub, login, and navigate to Account Settings. Under Security, select Personal Access Tokens. Generate a new token and copy it. Back in GitHub with the repo open, choose Settings, then on the left under Security expand Secrets and Variables, then Actions. Add a new secret named
DOCKER_HUB_PAT, and paste the token.Finally, add
push: trueto thebuild-push-action’s inputs to tell it to push the image (despite the name, it doesn’t do this by default). Here’s the complete configuration for reference:name: Build Image on: push jobs: build-image: runs-on: ubuntu-latest steps: - uses: actions/checkout@v4 - uses: docker/login-action@v3 with: username: cheetah26 password: ${{ secrets.docker_hub_token }} - uses: docker/build-push-action@v6 with: context: ./web-server tags: cheetah26/web-server:latest push: trueNow, commit and push the changes to your repository. The secret will be used by the
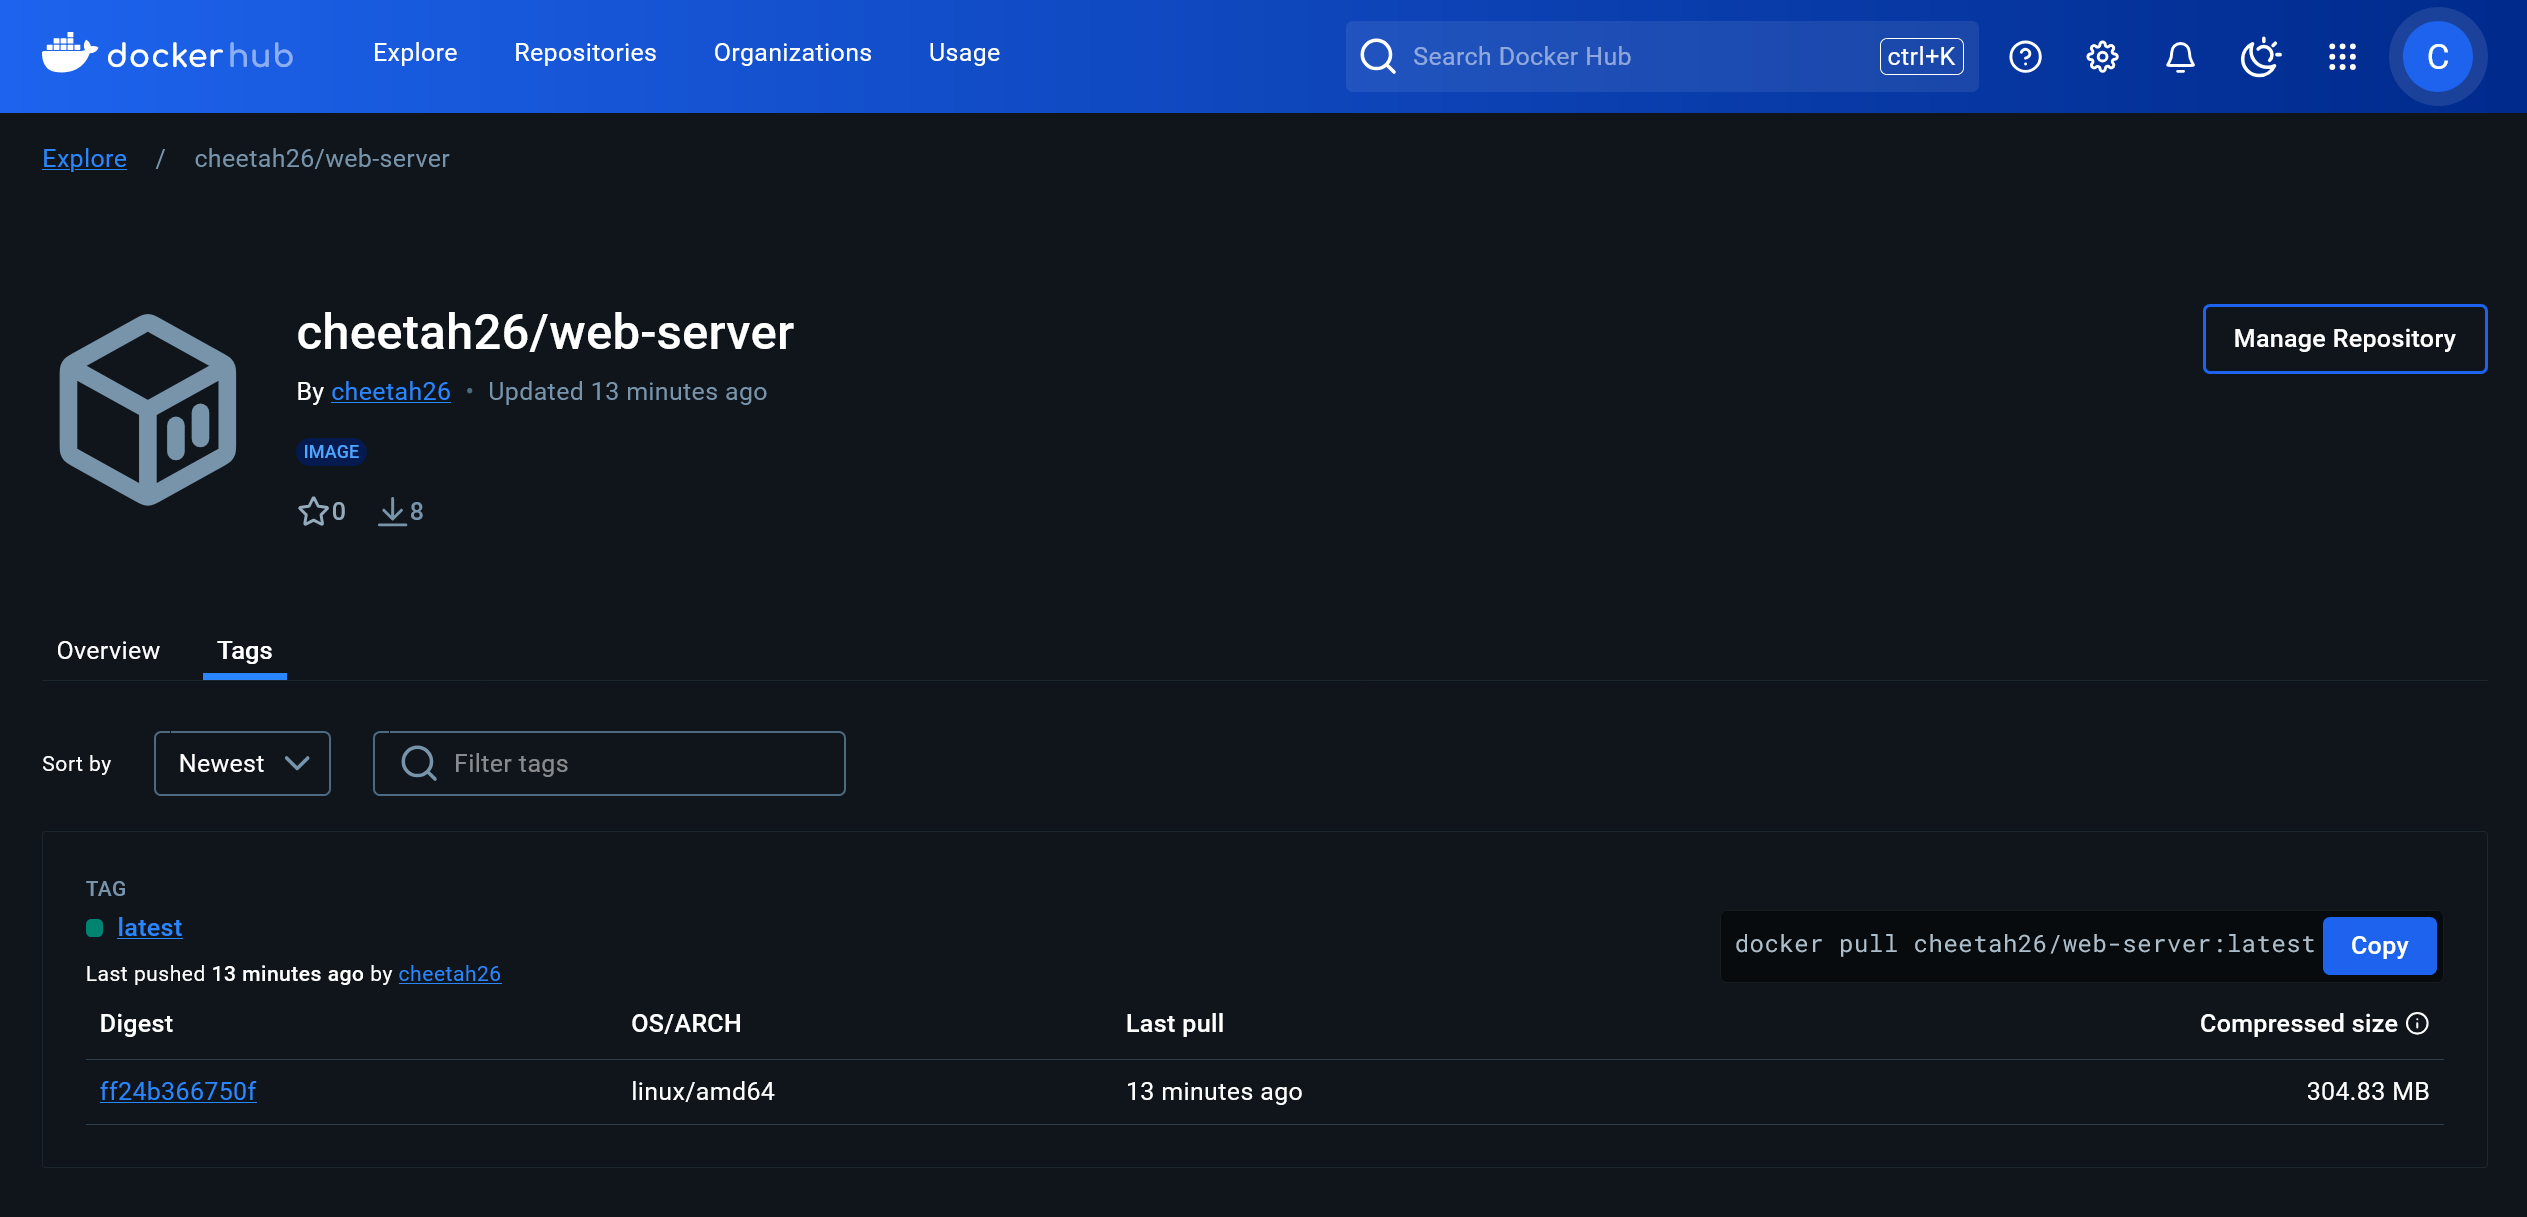
login-actionto authenticate and set up credentials for thebuild-push-actionto push the image. Check that the logs show success, and then on your Docker Hub profile you will see the new image uploaded.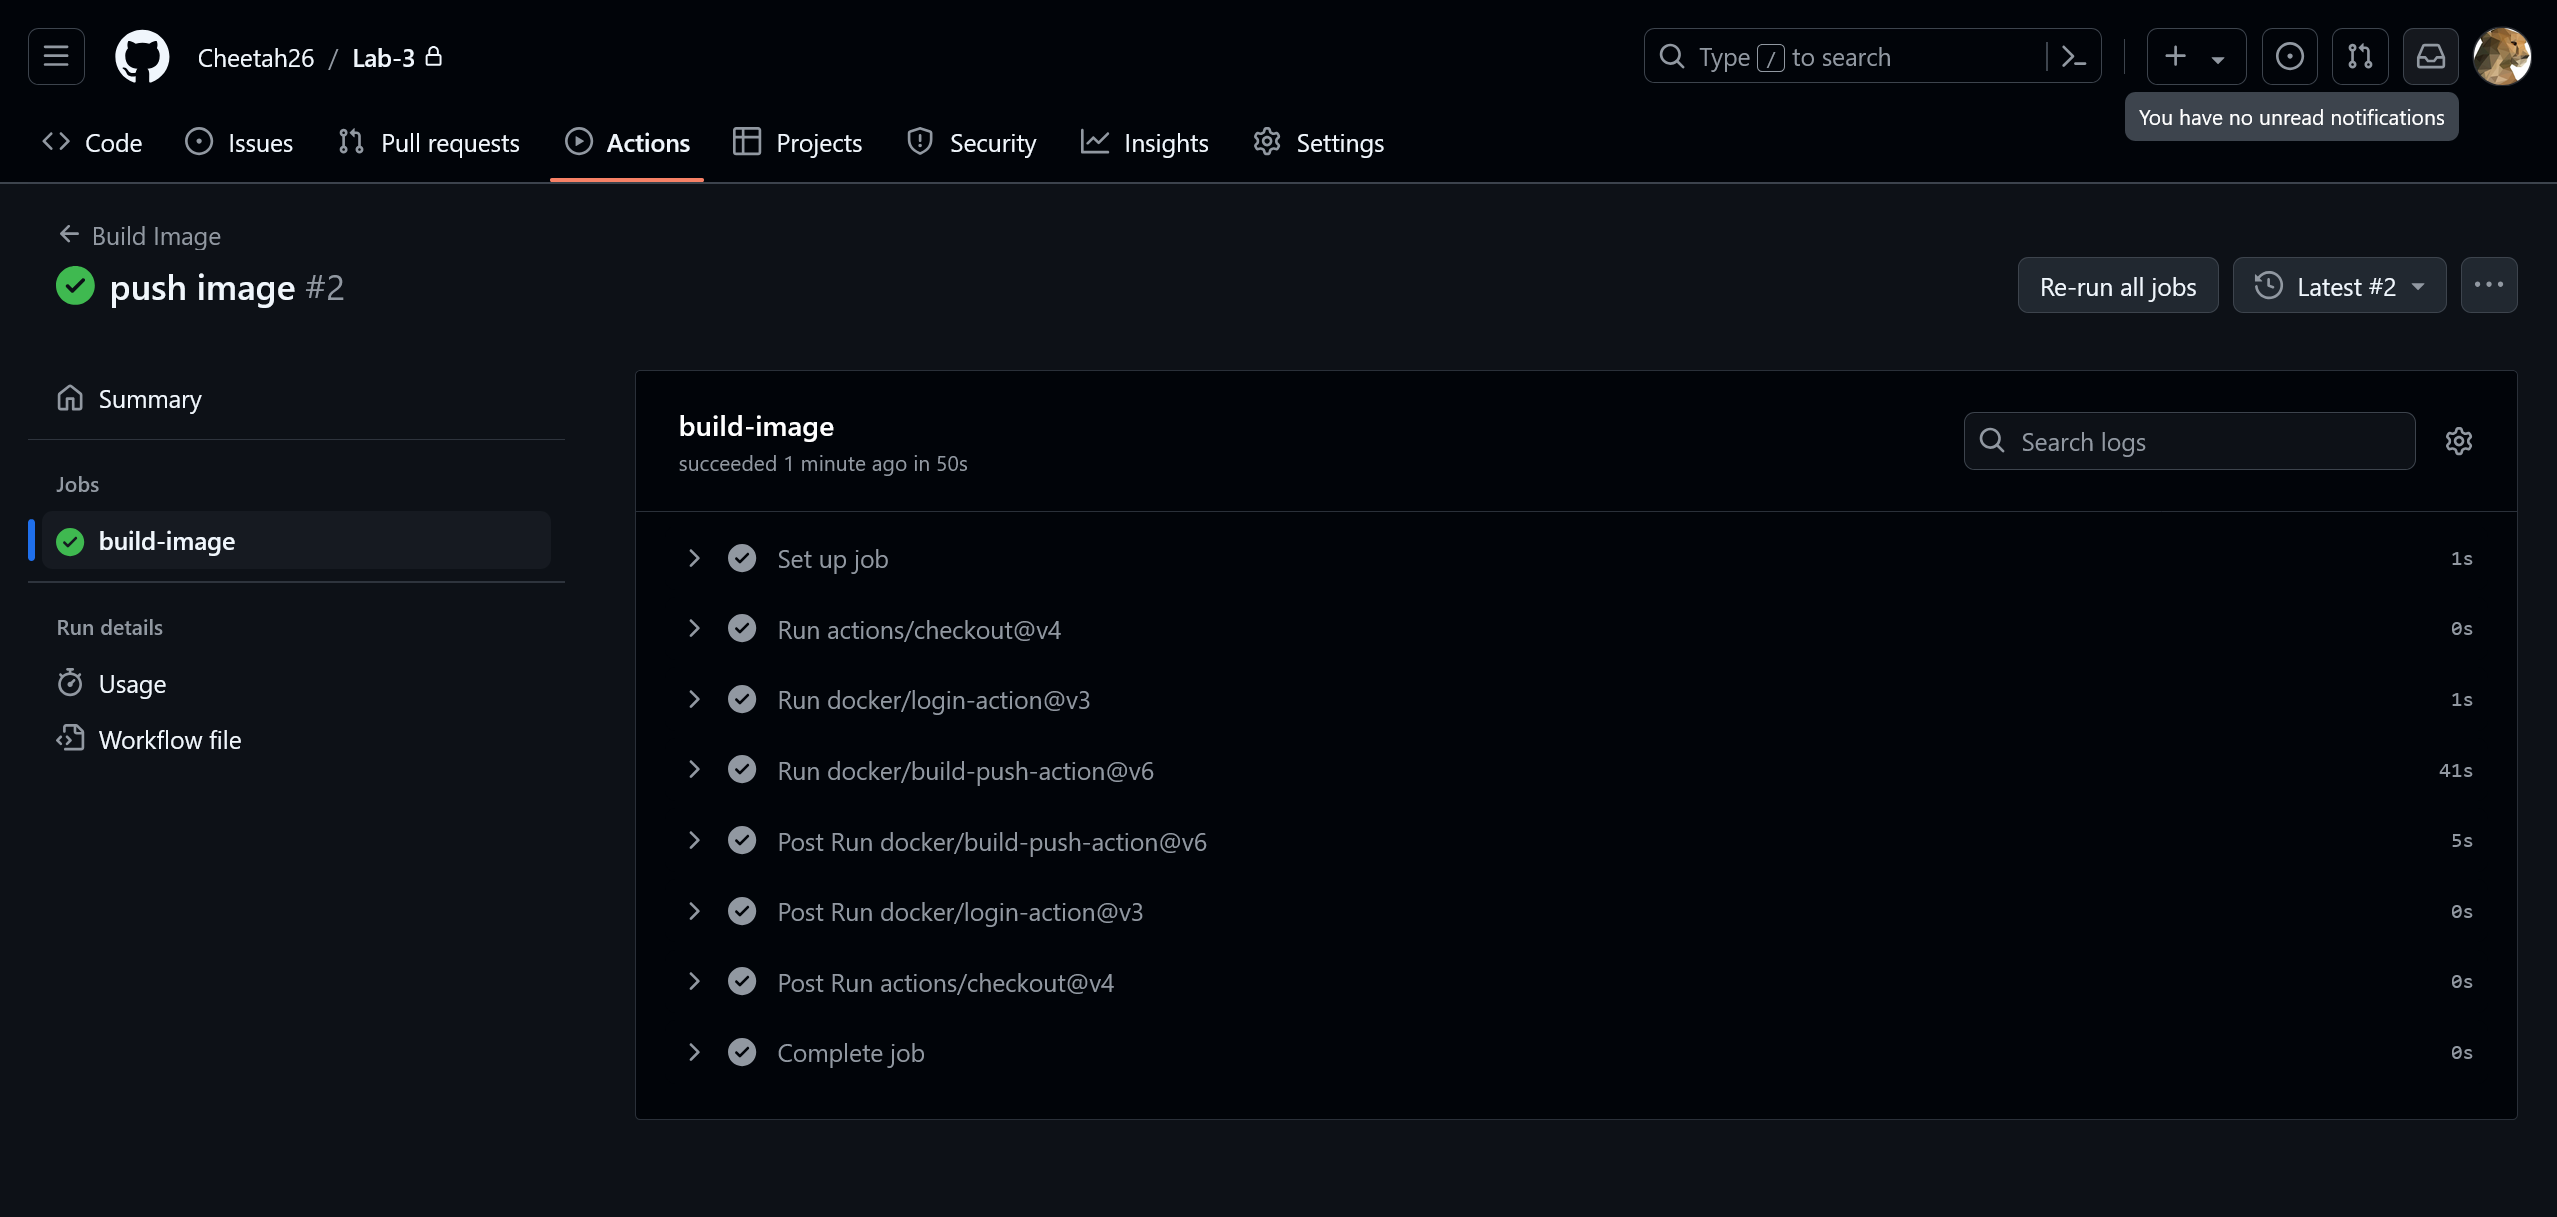
#Avoiding Duplication with Reusable Workflows
An important aspect of GitHub Actions is the ability to reuse pieces of configuration. At scale, this could become a of common utilities which abstract away the details that doesn’t change between runs. These components can take the form of actions, like we used in Part 1, or reuseable workflows, which are modified workflows that get called by a parent workflow. To see how this happens we’ll convert the Build Image workflow into a reusable workflow and then call it from two parent workflows.
The main difference between a normal workflow and a reusable one is that the reusable workflow’s
onsection contains an event calledworkflow_call. Here’s how thebuild-image.ymlfile from above gets modified to be reusable:name: Build Image on: workflow_call: inputs: tag: type: string required: true secrets: docker_hub_token: required: true outputs: image: value: cheetah26/web-server:${{ inputs.tag }} jobs: # ...The
workflow_callevent allows us to defineinputsandsecretswhich are passed by the parent and become available within the workflow, as well asoutputsthat get returned to the caller.Here there’s one input for the tag of the image we’re building, appropriately called
tag. You must specify the data type of the input, as well as whether or not it’s required. If someone fails to specify a required value, or provides the wrong data type, GitHub will stop the run during parsing which prevents wasted time and compute power on a job that would never succeed.We also are requiring that the caller pass a secret called
docker_hub_token. Secrets have to be included as inputs because reusable workflows are designed such that they can be shared across repositories. Unlike normal inputs, secrets don’t need their type specified because they are always treated as strings.Some actions will return information that is determined at runtime as outputs. For example, the
docker/build-push-actionprovides an output for the resulting image digest, which is computed as part of the build process. Similarly, reusable workflows can set outputs to pass to the parent workflow. Often these values are re-exporting the outputs of the workflow’s steps. This example is not particularly dynamic; its single output, calledimage, is the full image identifier based on thetaginput and a hard-coded name.Now the rest of the workflow needs to be updated to use these input values. The secrets are accessed normally, so we only have to change the name to match the secret input defined about. For accessing the tag, we again use the expressions syntax (
${{ }}) but this time referencing theinputscontext which is available in reusable workflows and actions.# ... jobs: build-image: runs-on: ubuntu-latest steps: - uses: actions/checkout@v4 - uses: docker/login-action@v3 with: username: cheetah26 - password: ${{ secrets.DOCKER_HUB_PAT }} + password: ${{ secrets.docker_hub_token }} - uses: docker/build-push-action@v6 with: context: ./web-server - tags: cheetah26/web-server:latest + tags: cheetah26/web-server:${{inputs.tag}} push: trueIt’s worth noting at this point that this workflow isn’t particularly reusable. There are a few hard-coded values such as the username, image name, and build context. While these values could be extracted and replaced with inputs, for such a simple workflow, particularly one intended to be used in a single project, this would be overkill and lead to duplication when calling the workflow and reducing the benefits of extracting them in the first place.
In a new workflow file called
latest.ymlwe’ll just define a run condition and a job to call the reusable workflow. It’s important to notice that thebuild-imagejob syntax is different from what we wrote previously. Unlike before where there were multiple steps (either running a command or calling an action), calling a reusable workflow constitutes an entire job on its own. Instead of thestepssection we have a top-leveluseswith a path from the root of the repository to our desired workflow file. Then, like when calling actions, we place the information we want to pass to its inputs under thewithsection.name: Latest on: push jobs: build-image: uses: ./.github/workflows/build-image.yml with: tag: latest secrets: docker_hub_token: ${{ secrets.DOCKER_HUB_PAT }}For this workflow we’re replicating the functionality from Part 1: on every push, we want to call the reusable workflow which will build the image with the provided tag
latestand authenticate with Docker Hub using theDOCKER_HUB_PATrepository secret.Next, we’ll create a second parent workflow called Release which will call the build-image workflow when there is a commit tagged with a version number is pushed. I copied
latest.ymlto another file calledrelease.yml, and made the following changes:- name: Latest - on: push + name: Release + on: + push: + tags: + - v** jobs: build-image: uses: ./.github/workflows/build-image.yml with: - tag: latest + tag: ${{ github.ref_name }} secrets: docker_hub_token: ${{ secrets.DOCKER_HUB_PAT }}Beyond changing the name, this snippet also introduces a new attribute for the
pushevent:tags. It allows us to specify specific tags or expressions↗ which must be associated with a commit in order for this workflow to trigger. The expressionv**just means any tag that starts with the letter v, and is possibly followed by other characters, which means it’ll match tags likev1orv3.32.5, though be aware it would also run for, e.g.,v2.0-alpha.For the
taginput, we’re introducing another context, the github context↗. It has a lot of properties, one of them beingref_namewhich is useful with tagged commits because it gives us the plaintext of the tag. This might be a little confusing because there are two kinds of tags we’re working with. Plainly: when we push a tagged commit, the Git tag (1) is being passed to the reusable workflow as our container image tag (2).Stage and commit the changes, then push them. Check the Actions tab on GitHub to see what happens.
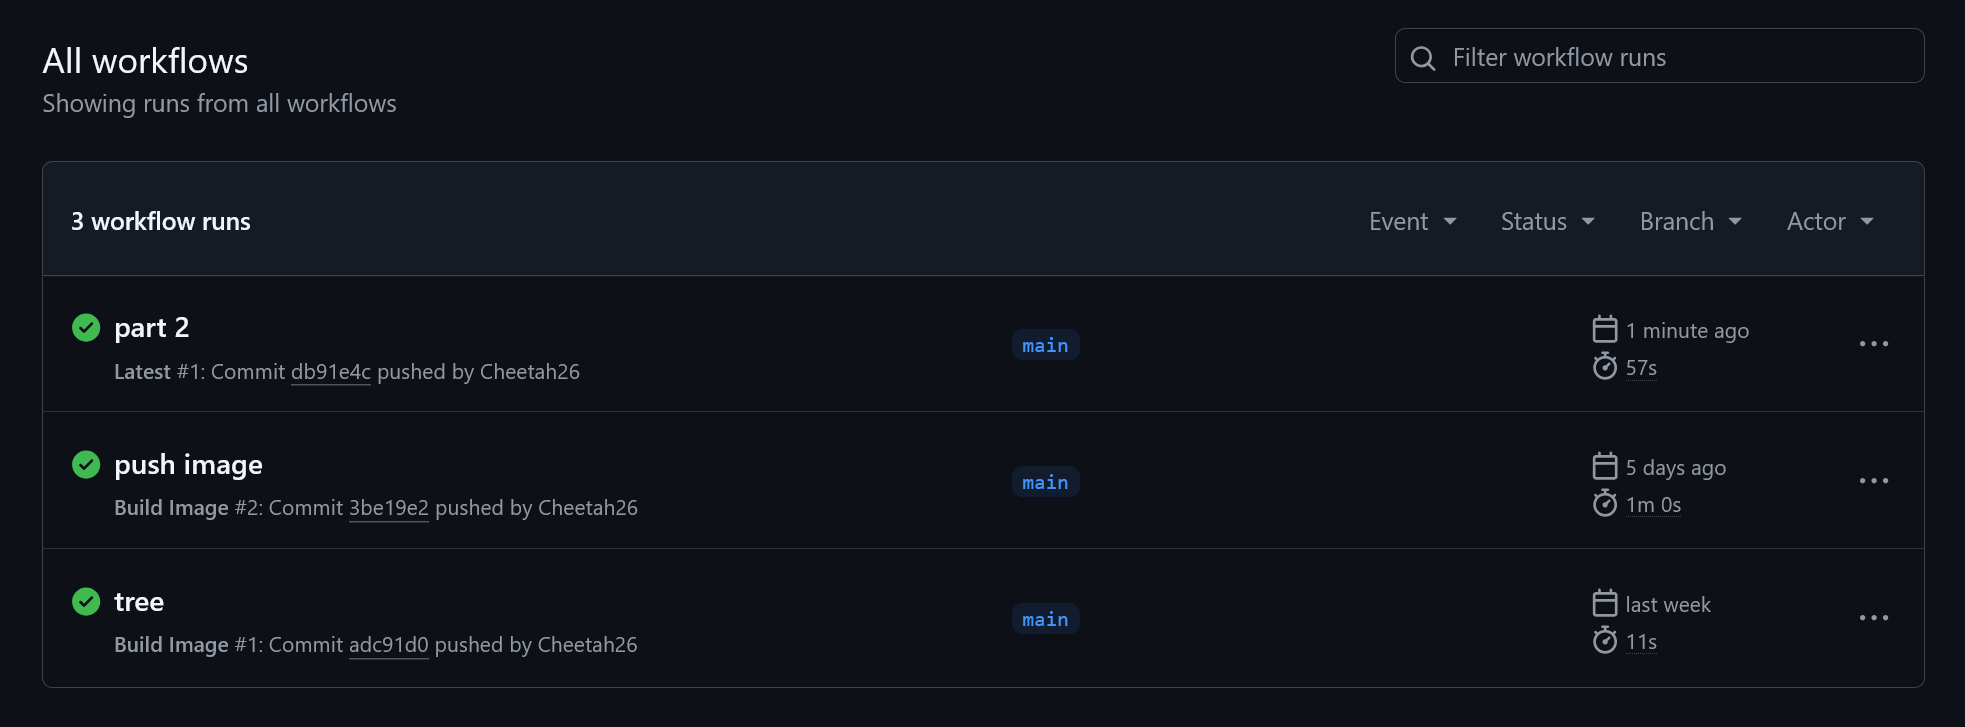
You will see that the Latest workflow runs, but not Release. Why? Because we didn’t tag our release. Back at the command line, use the following to tag the latest commit and push it to GitHub:
$ git tag v1
$ git push origin v1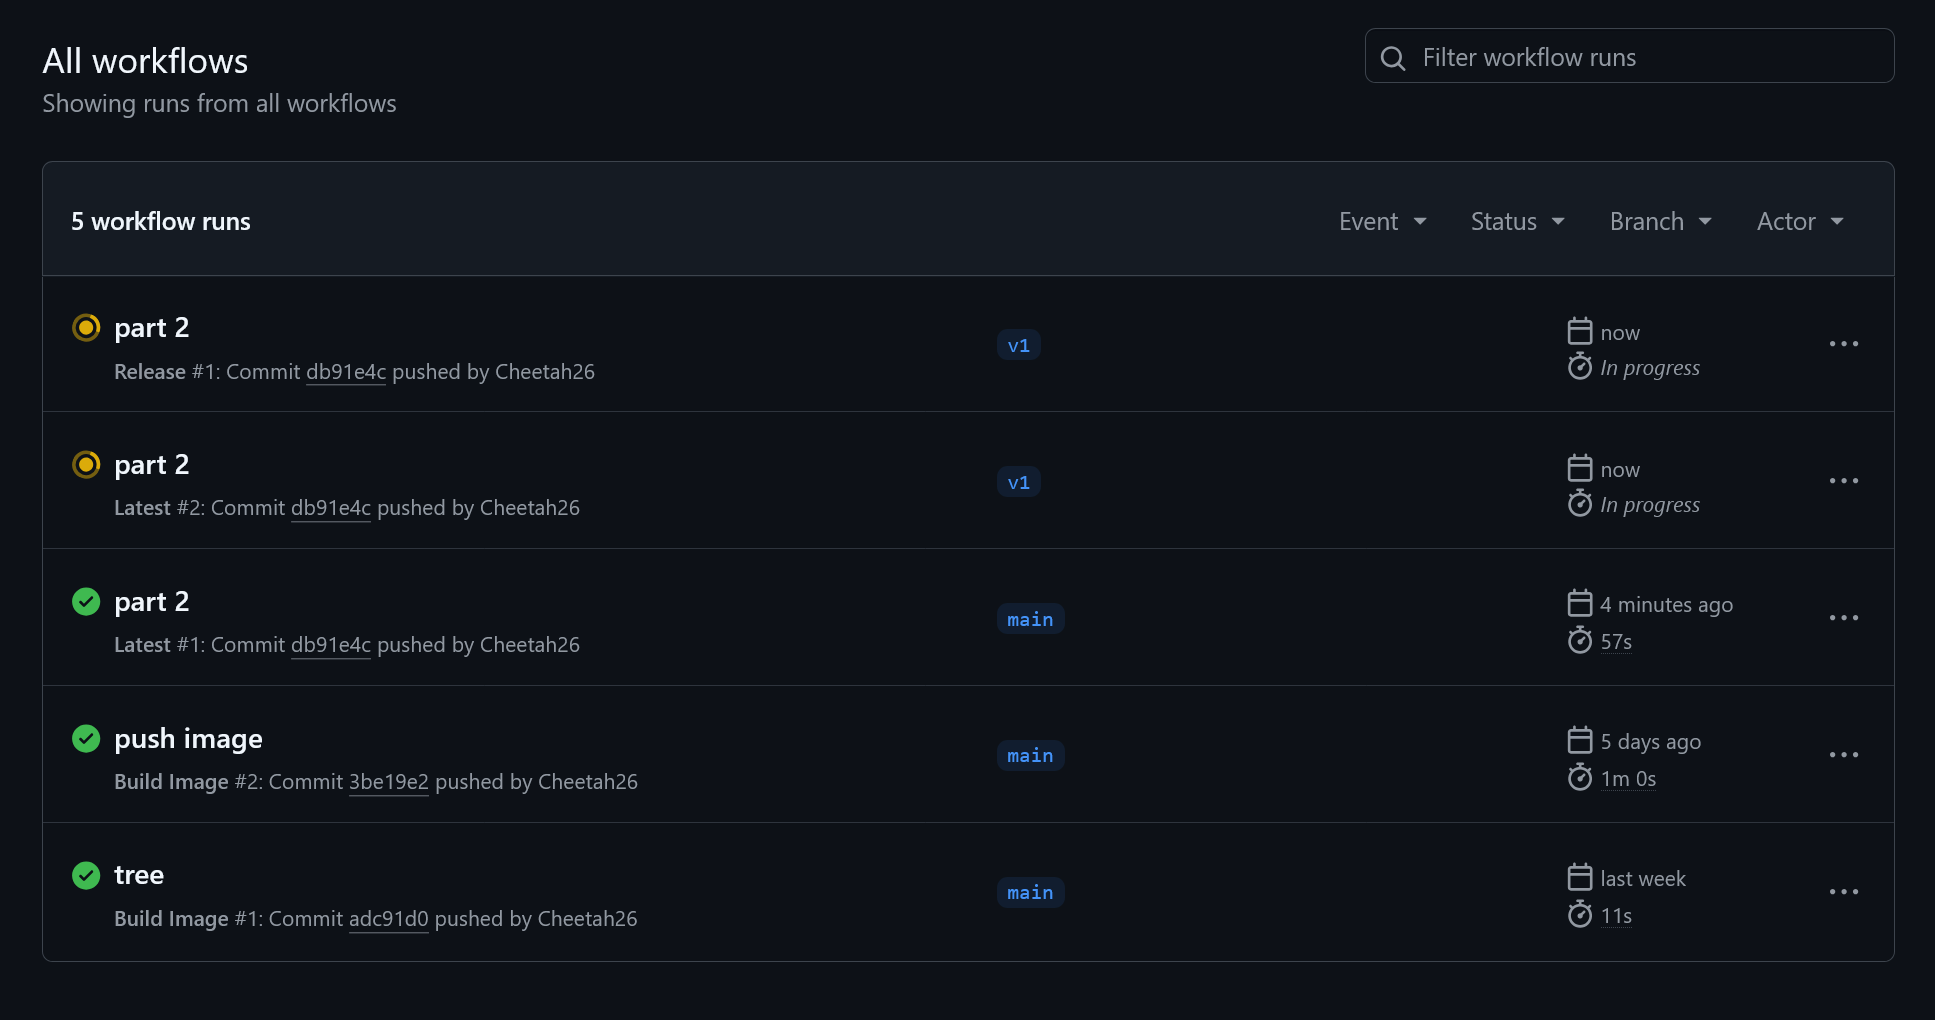
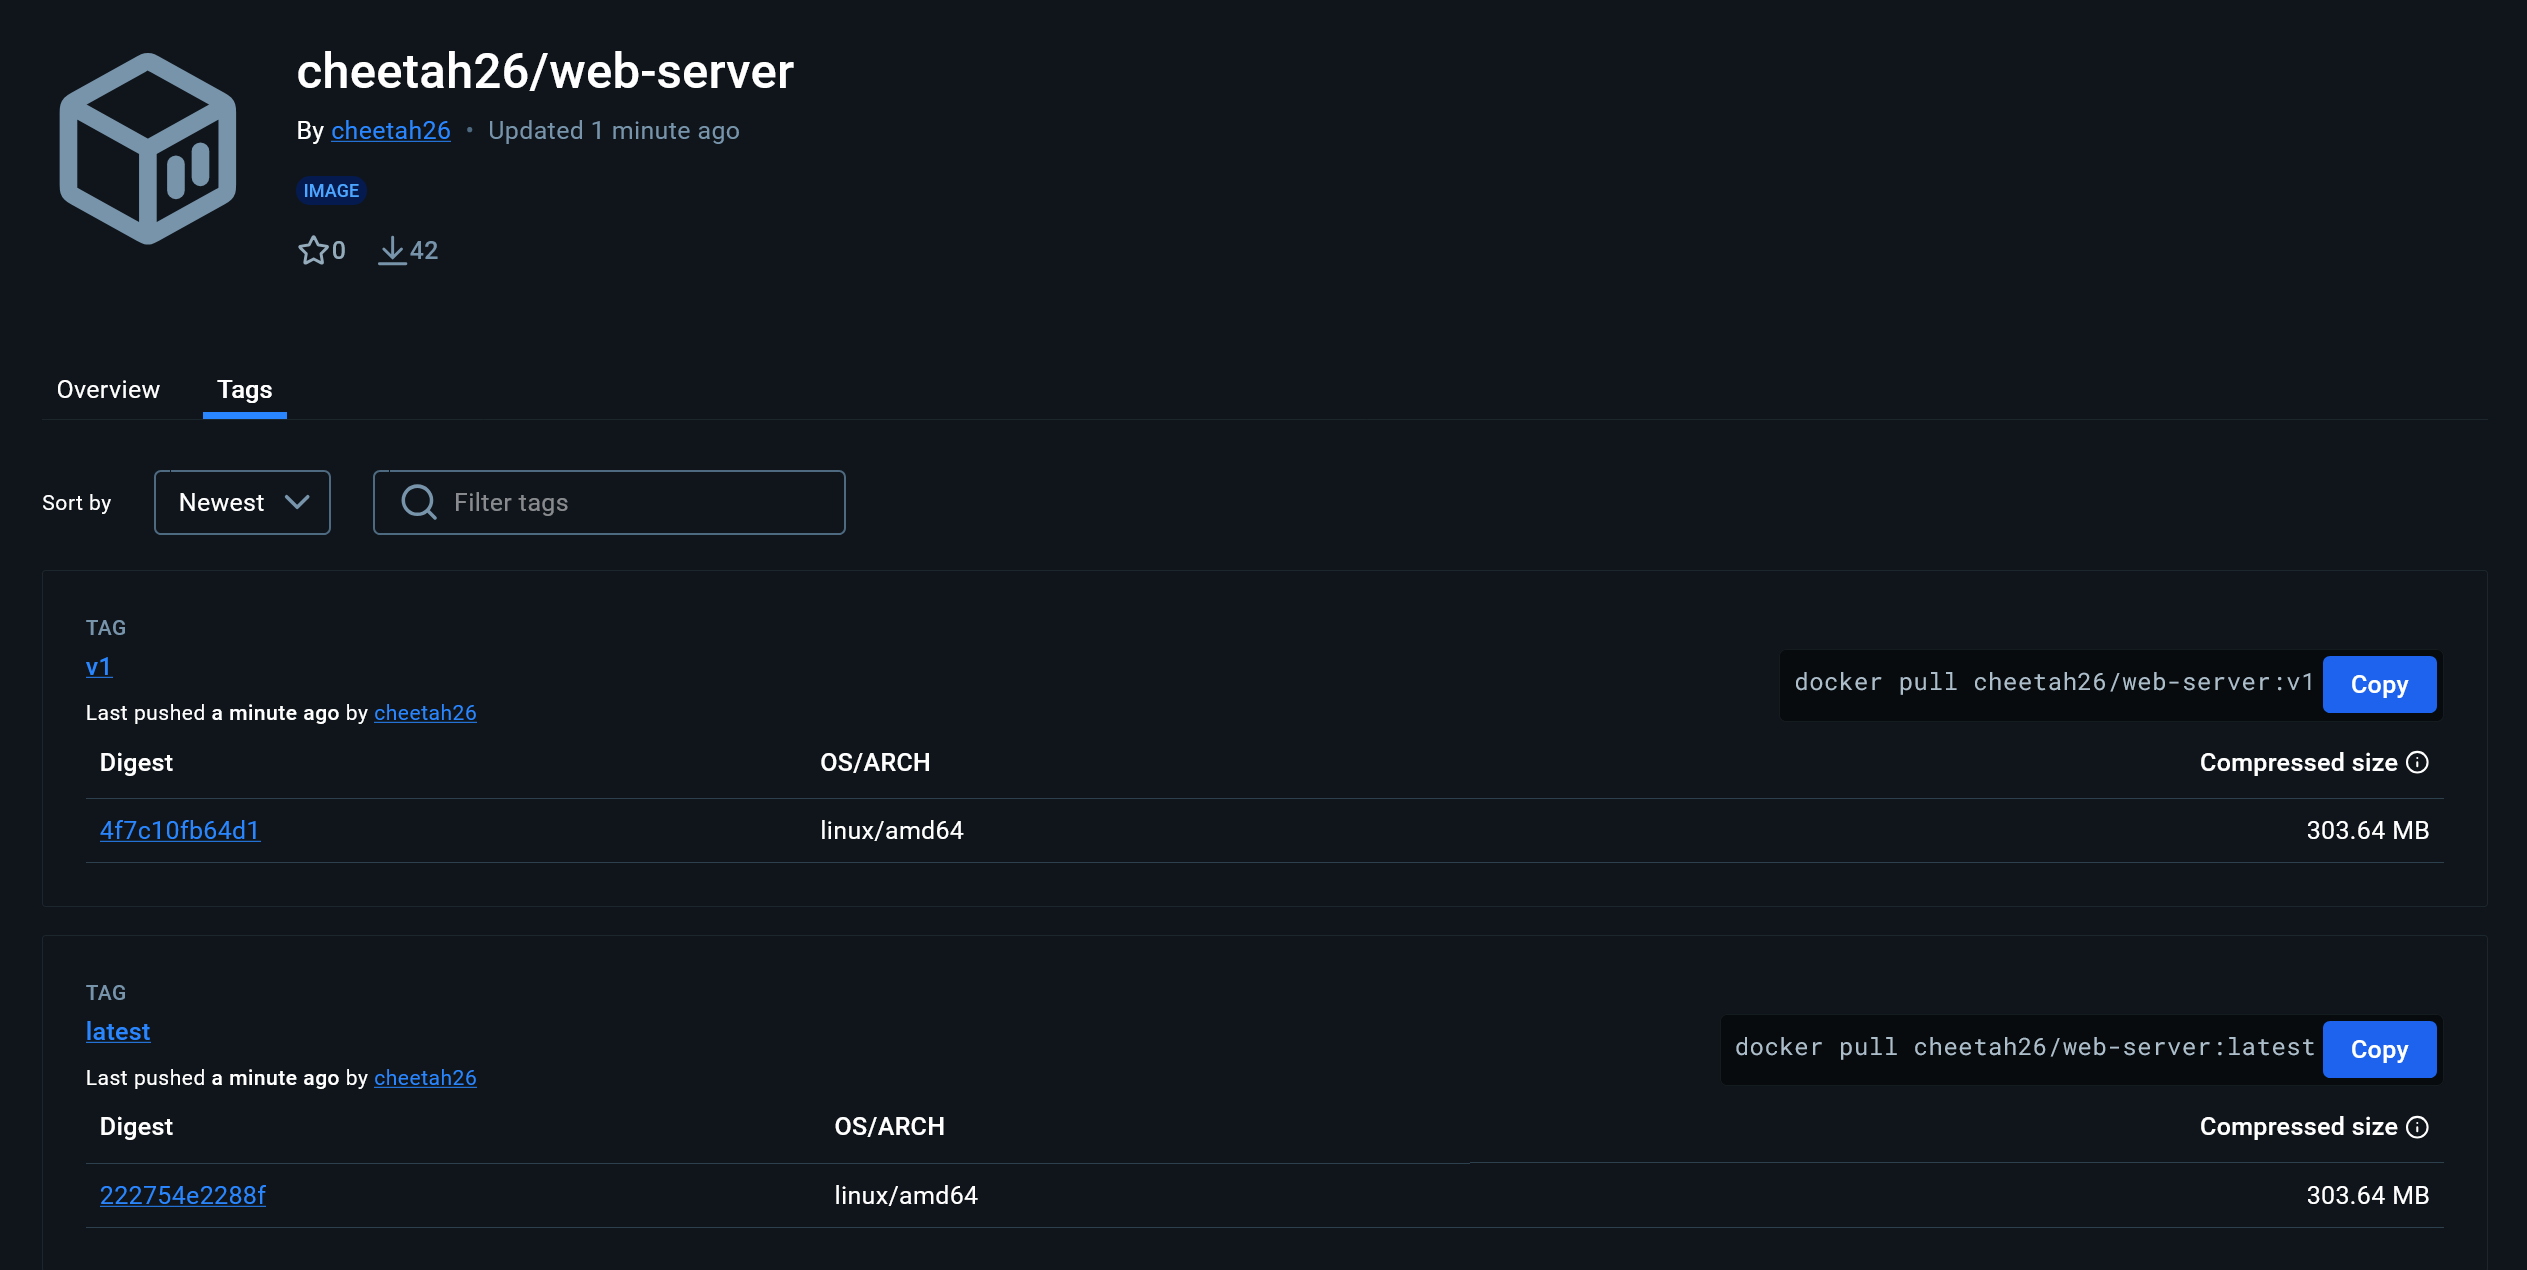
And when the run completes we can see both images on Docker Hub:
Some notes:
Currently, the Release and Latest workflows are executing the same task. Both are building the Docker image independently. One simple solution would be to add more detail to the run conditions for the Latest workflow, excluding it from running when there is a
v**release tag. Then, to make sure that the:latestimage on Docker Hub still gets updated, add specify both tags to be pushed by the Release workflow.jIn this part we avoided duplication by writing a reusable workflow, but you could choose instead to write a custom action. The main difference is that reusable workflows consist of jobs, whereas actions are sets of steps. This means that they are run very differently. A reusable workflow executes entirely separately from other jobs, only able to access the information directly passed to it. Also, having multiple jobs means that it could run multiple tasks concurrently. Actions on the other hand execute in the context of where they are called. They can access the parent workflow’s runner host files, environment variables, etc., and will complete in-sequence with the other steps of the parent job.
#Deploying to GCP Cloud Run
Actions allow you to not only build software, but also to deploy it to various places. In this section we’ll look at setting up a project on Google Cloud Platform (GCP), creating a new reusable workflow to deploy the container from previous steps to Cloud Run, and incorporating it into the Release workflow.
First go to https://console.cloud.google.com/projectcreate↗ and create a new project. Mine is named
Lab 3. If you are not redirected to the project dashboard after creation, and use the project selector in the top left to open it.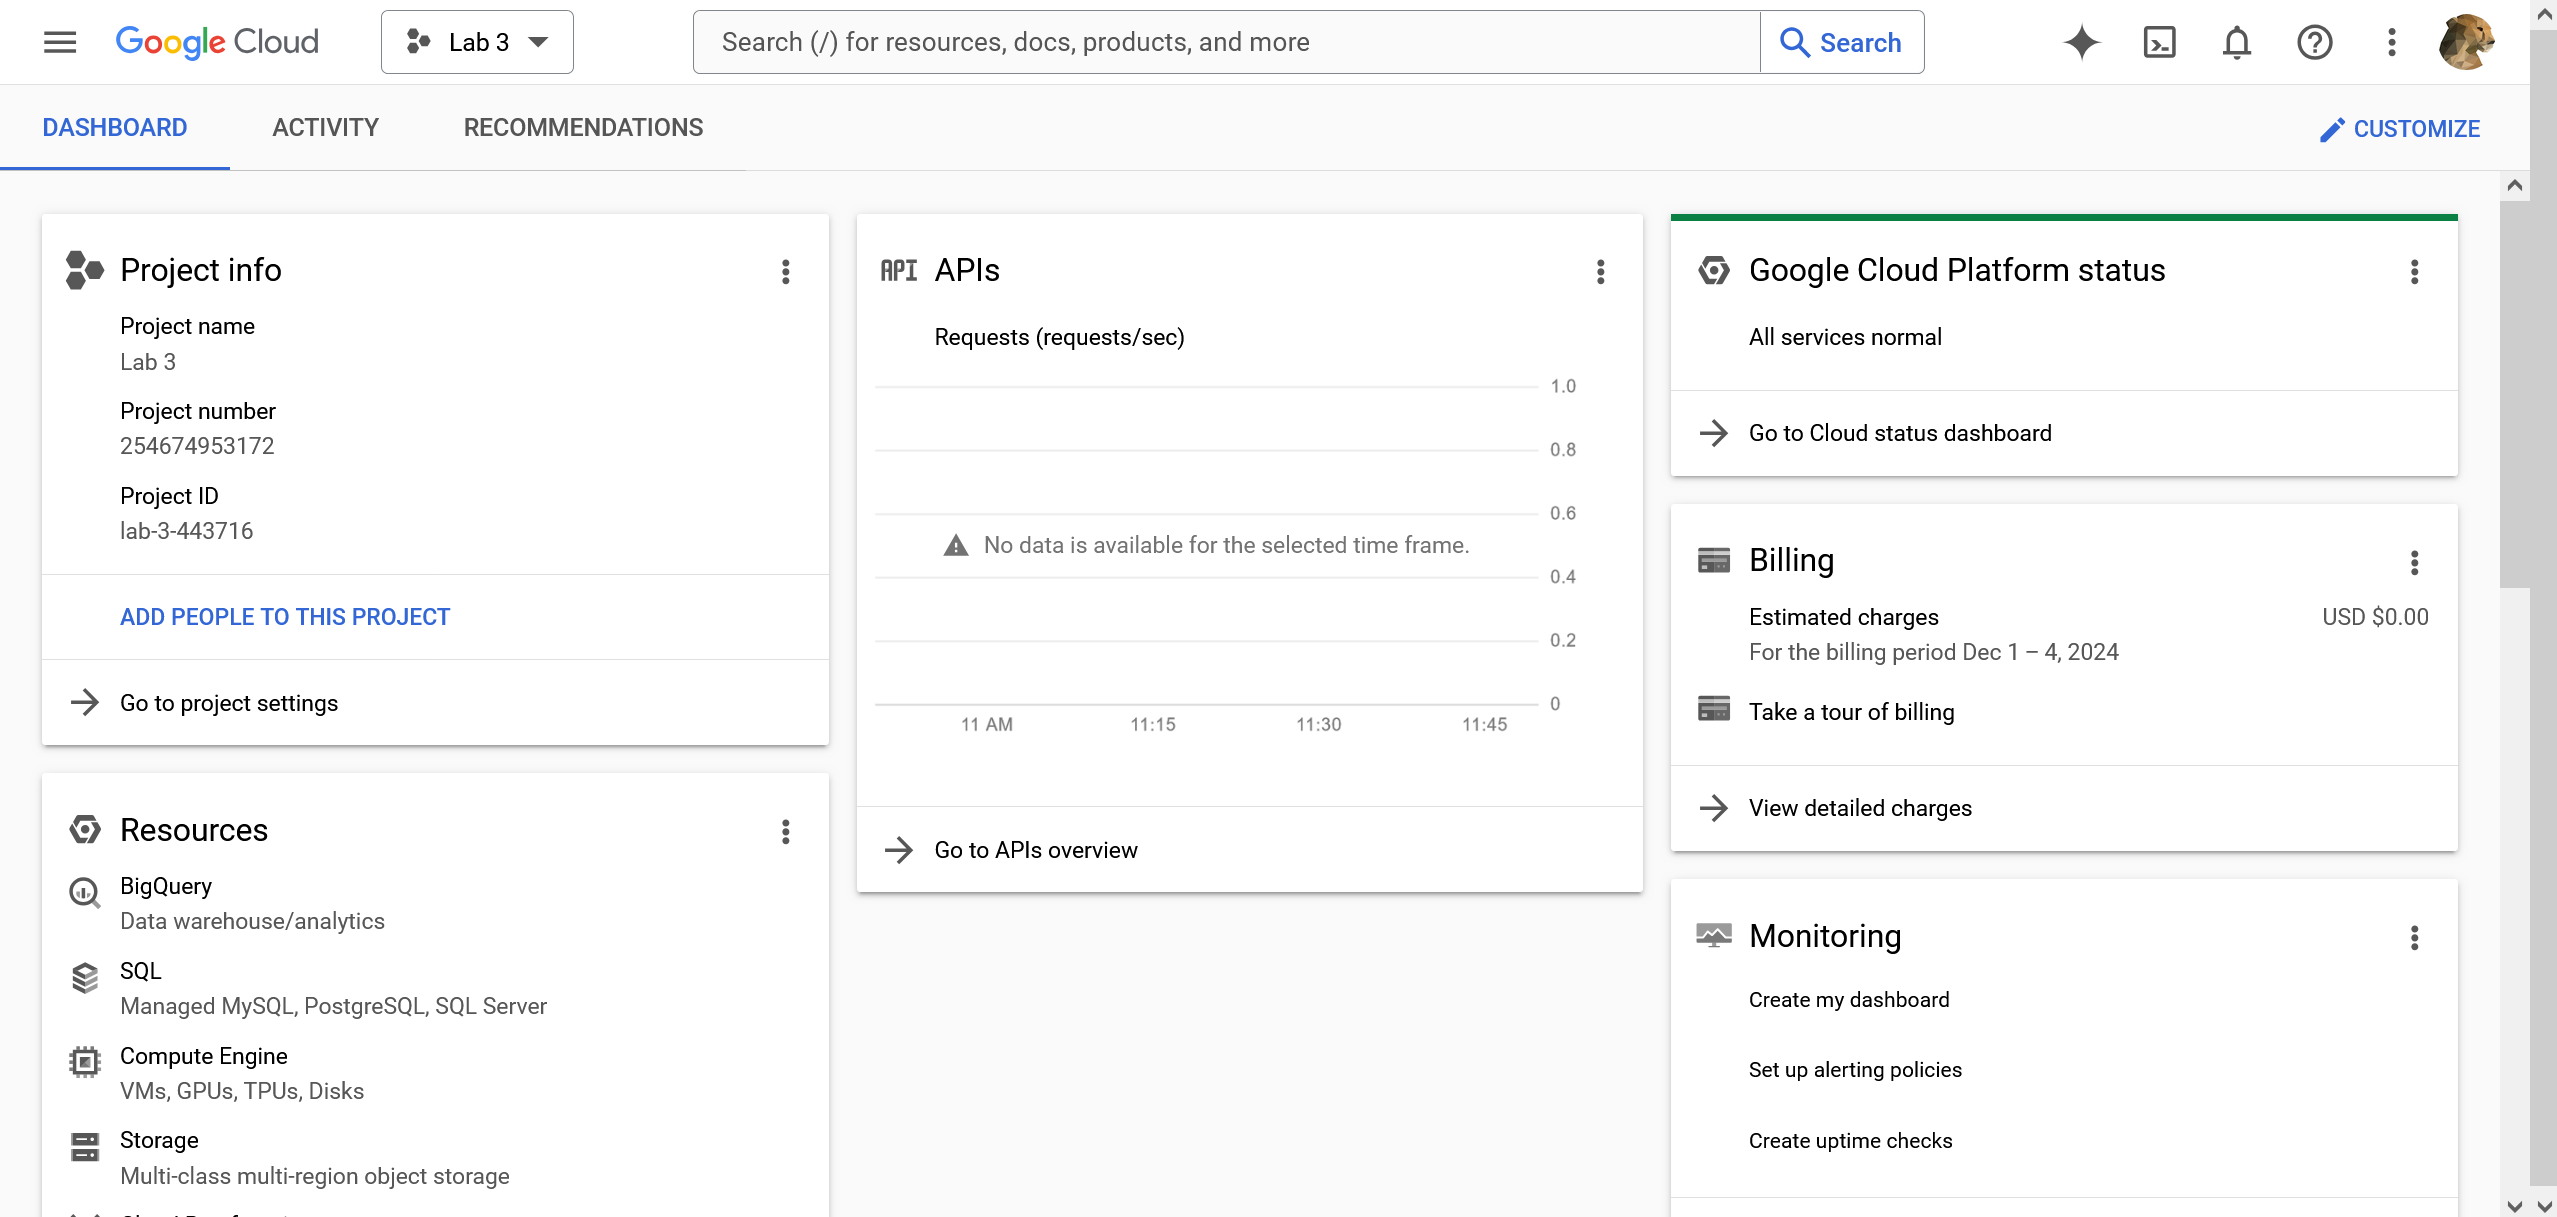
In order for GitHub Actions to access the project, you need a service account in GCP with the necessary permissions and an authentication token for that account that gets stored as a repository secret on GitHub.
To create the account:
Open the
IAM & Admin↗ management pageTip: If you are unfamiliar with the Google Cloud Console, using the search is often the easiest way to navigate
On the left pane, select
Service AccountsCreate a new service account, with the name
GitHub Actions. The ID and description are optionalChoose
create and continueto progress to the roles tab of the wizard. We will grant two roles:Service Account UserCloud Run Admin
Click
continueand thendone. We don’t need to grant any users access to this account because GitHub will be accessing it directly.
When you’re done you’ll see it in the service accounts list:

Next, add a key (authentication token) to the service account and create a secret for it on GitHub.
On the far right side of the service accounts table under Actions, click the three dots and select
Manage keysChoose
add key>Create new keyKeep the default JSON key type selected and click
continue. The key will automatically be downloaded as a JSON fileCopy the entire contents of the JSON file, and then in GitHub add it as a new secret called
GCP_KEYNote: Google recommends removing line breaks from the JSON file before storing it as a secret. I did this in VS Code by searching for
\nin regex mode, then replace all with no characters.
Finally, back in the GCP Console we need to enable the Cloud Run Admin API↗ from the marketplace. Either use that link or the search bar to view it’s product page. From there, simply click the
enablebutton.Everything is now in place to write a deployment workflow. Create a new workflow file called
deploy-gcp.yml. Unlike the Build Image reusable workflow, this one will be truly modular (i.e. it has no configuration specific to this repository). Choose a sensible name, likeDeploy GCP, and then using theworkflow_callevent trigger add the following parameters:- Inputs:
service-namestring, requiredimagestring, required
- Secrets:
gcp_keyrequired
- Inputs:
Next, we’ll setup the job. Here’s what it looks like:
# ...
jobs:
  deploy-gcp:
    runs-on: ubuntu-latest
    steps:
      - uses: google-github-actions/auth@v2
        with:
          credentials_json: ${{ secrets.gcp_key }}
      - uses: google-github-actions/deploy-cloudrun@v2
        id: deploy
        with:
          service: ${{ inputs.service-name }}
          image: ${{ inputs.image }}
          flags: --allow-unauthenticated
      - run: "echo 'Live URL: ${{ steps.deploy.outputs.url }}' >> $GITHUB_STEP_SUMMARY"
Similar to the workflow for Docker Hub, we authenticate with one action and then do some work with another. Notice though that we did not checkout the repository like in the first step for Build Image. Since this job pulls the built image from Docker Hub, it doesn’t need access to the repo’s code. We use the
google-github-actions/authaction to login, referencing our JSON key secret. Then, use thedeploy-cloudrunaction with the desired service name and image from the inputs. Theflagsoption is for additional parameters that get passed to thegcloudCLI, which this action uses under the hood. Cloud Run defaults to only allowing traffic authenticated by our project’s IAM, which would prevent this site from being publicly accessible. You can read more about these settings in the action’s readme↗. Theidis also a new field which allows us to reference details about this step from elsewhere.Finally, there is an additional
runstep which is echoing something into a path defined by an environment variable$GITHUB_STEP_SUMMARY. If you look back at the overview for a previous action run, you’ll see that thedocker/build-push-actionproduces a “Docker Build Summary” that is nicely presented on GitHub. This is how that information is output by the action.In Part 2 we covered that actions and reusable workflows can have outputs. To access them use an expression with the
stepscontext and theidof the step. According to thedeploy-cloudrunaction documentation, thedeploystep here will have exactly one output,url, which is where the deployed site will be publicly available. Including the site’s URL in the step summary makes it quickly accessible, rather than having to login to the GCP Console or explore the job’s logs to find it.Finally, in
release.ymlwe’ll add the call to Deploy GCP as an additional step:# ... jobs: # build-image: ... deploy-gcp: needs: build-image uses: ./.github/workflows/deploy-gcp.yml with: service-name: web-server image: ${{ needs.build-image.outputs.image }} secrets: gcp_key: ${{ secrets.GCP_KEY }}This should be straightforward as it is mostly the same as Part 2 except for the lines referencing
needs. In a workflow jobs are run concurrently by default, however, in some cases such as this one job depends on another. To indicate this, we use theneedsproperty with a name or list of names of other jobs that should finish before this one starts. If the output(s) of a dependency job are needed, use theneeds.<job id>.outputs.<output>expression as seen here to get the image name from the Build Image reusable workflow.Commit the changes. Before pushing be sure to tag the commit so the Release workflow will trigger. I choose to increment the version and tag it as
v1.1.In GitHub, you’ll see that the Latest and Release workflows run. Latest is the same as last time, but Release shows our new Deploy GCP reusable workflow. Notice that the UI nicely visualizes the workflows with the order they were run. If one of them had multiple jobs, we would also be able to see those stacked vertically within the tile.
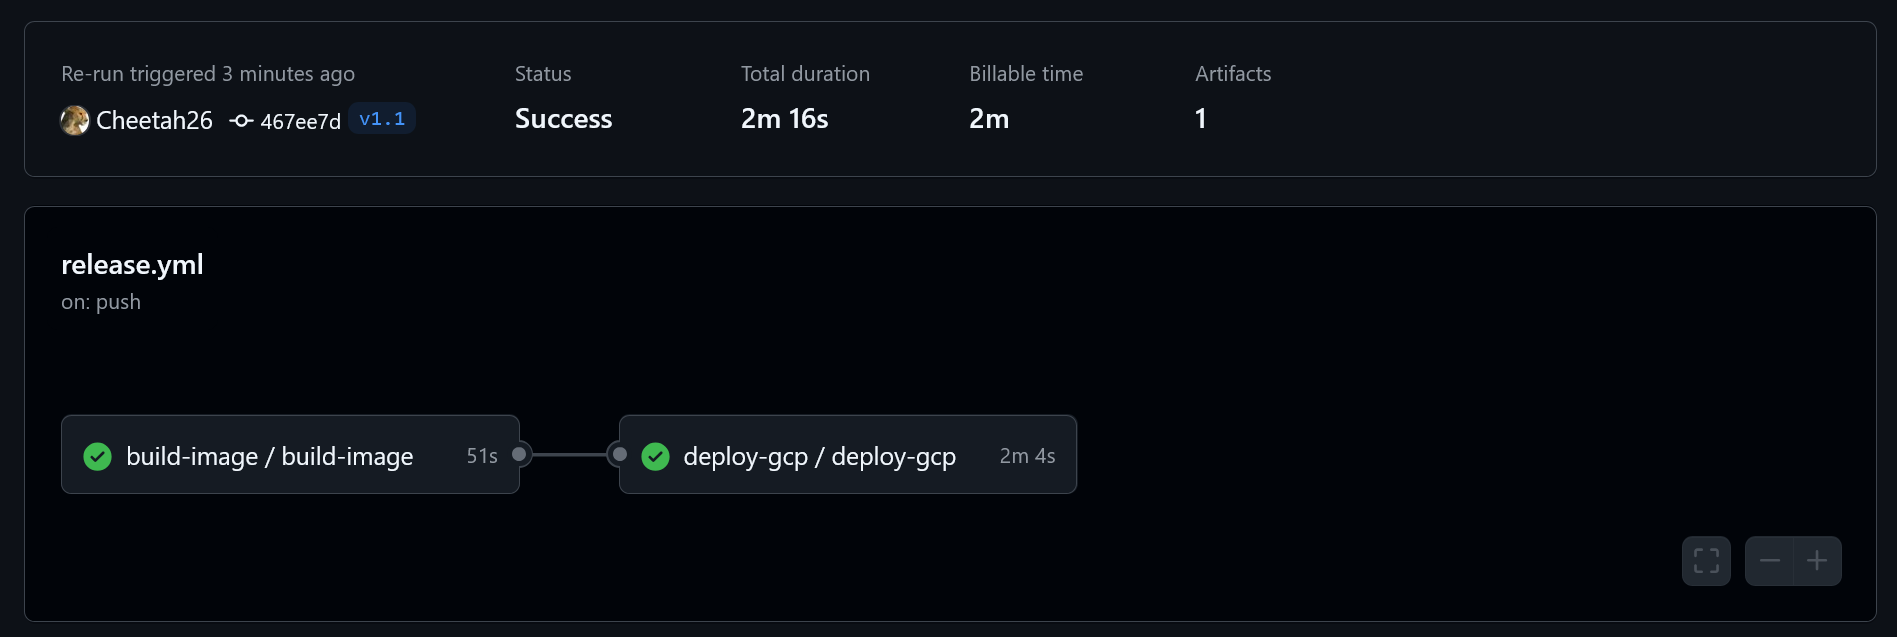
When both tasks are complete, we can see the step summary created by the Deploy GCP workflow farther down the page:

Besides checking that the site loads, we can also open the Cloud Run management screen↗ to see that it shows that service created correctly:
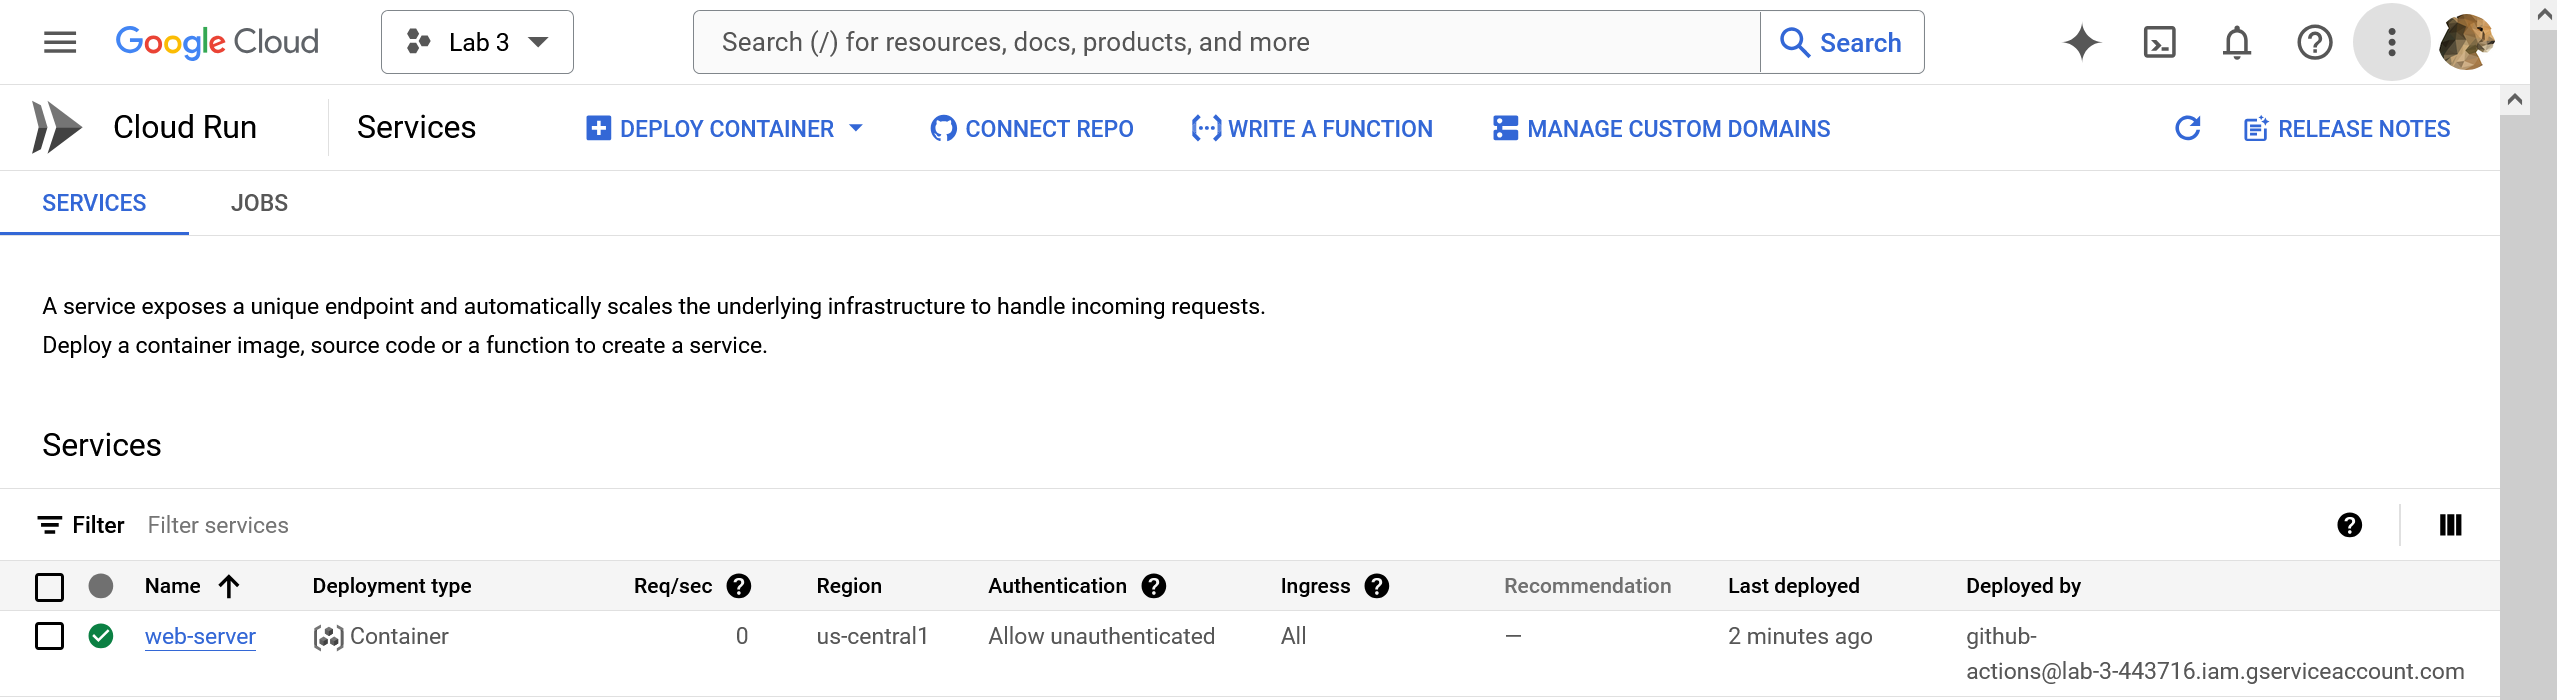
Note that the service was deployed by the service account we made for GitHub Actions.
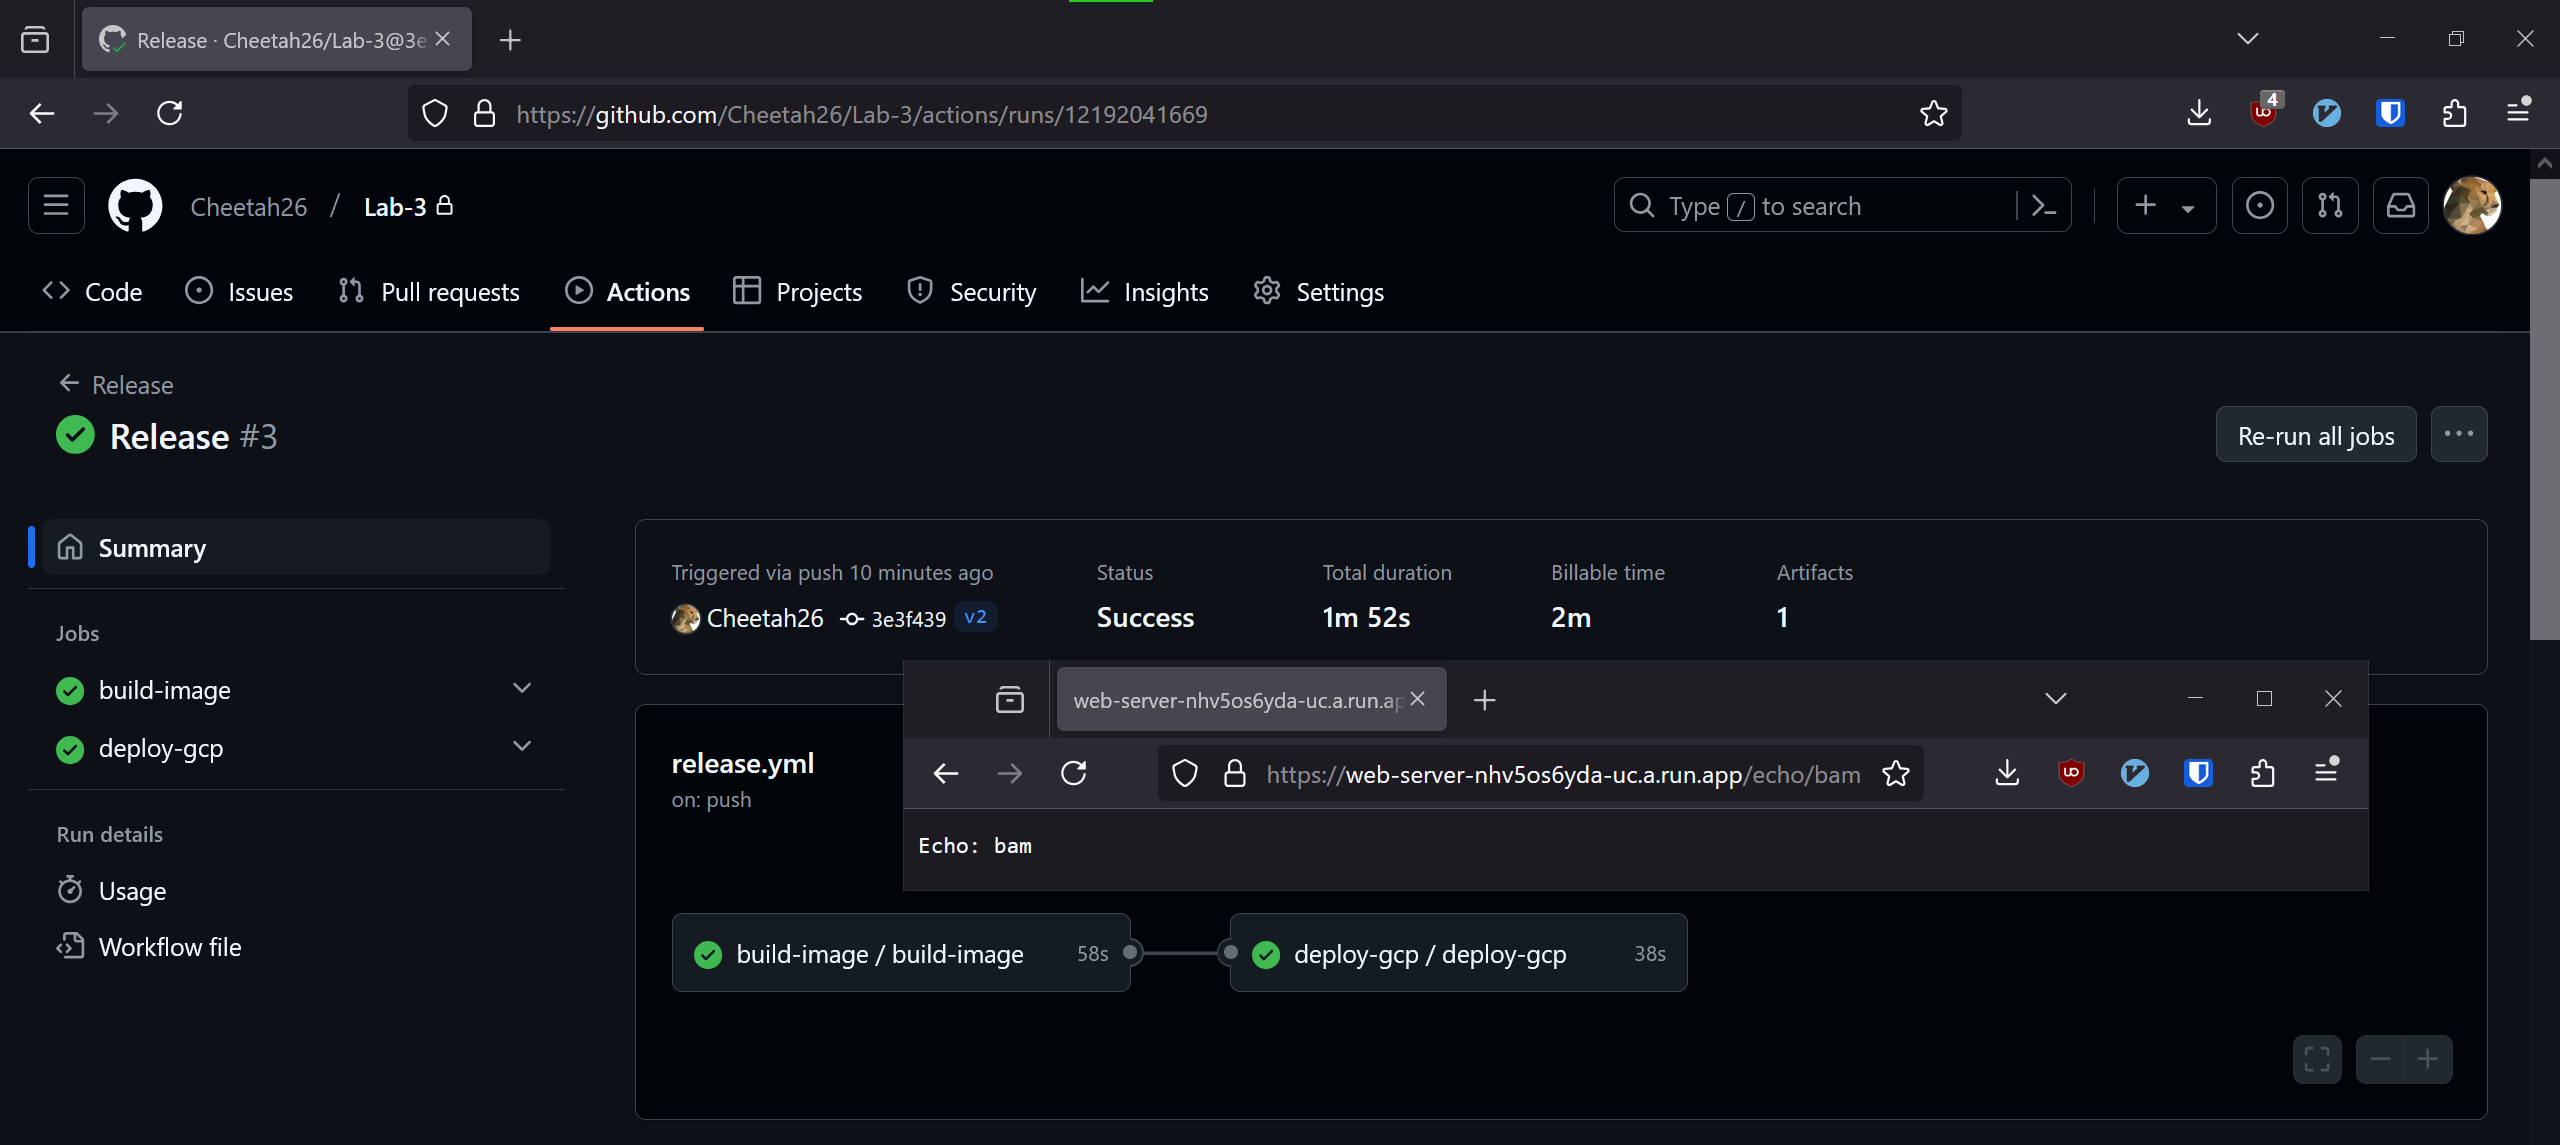
Since everything is as it should be, the final test is to see how the app handles updating. In my
web-serverapplication source code I enabled a new endpoint/echo, then committed the changes taggedv2and pushed them.The image automatically re-built, pushed to Docker Hub with the new version tag, and re-deployed on Cloud Run.
#Conclusion
GitHub Actions provides a straightforward process for automating the building and deployment of software hosted on the platform. The focus on reusable pieces of configuration combined with the publicly available actions makes setting it up very quick in many cases, while the simple conceptual model and templating syntax for variables makes it adaptable to complex situations.
The same results could be achieved through other tools. For example, GCP offers its own CI/CD pipeline for building and deploying from changes to a GitHub repo which is a viable alternative to the method shown here. Using the built-in CI/CD from GCP might be beneficial for gaining a tighter integration between the building, testing, and deployment steps, such as not having to upload build results to a 3rd-party registry because they would already be on Google’s servers. It also would create separation between the codebase and the build which could be useful, for example, when an organization wants public code with proprietary deployment steps. On the other hand, using GitHub Actions makes the build and deployment easily publicly viewable allowing others to audit your work if desired. It also minimizes vendor lock-in as you could easily adapt individual steps to use different integrations. Similarly, the configuration is text-based which makes it clear to understand, modify, and store elsewhere if necessary.
Lastly, compare Actions to two other potential text-based software deployment methods:
- A Bash script which imperatively defines, step by step, each command or API call necessary to build out infrastructure.
- Terraform, where all configuration is declarative, i.e. an ordered collection of definitions for what is needed but not how to create it.
GitHub Actions appears to be somewhere in-between these two other options. While the configuration is not simply writing code or a script like with bash, the order of actions often matters so some thought has to be applied to organizing things accordingly. It feels more similar to Terraform, as many pieces can easily be reused and shared, and the existence of public actions abstracts some configuration to the point that they are practically declarative. On the other hand, Actions can also consist of steps which are just running commands, meaning it maintains the flexibility of scripting when necessary.
As mentioned at the beginning, the complete code is available to view on GitHub↗.